
SVG wave dividers and blob shapes have become a standard element in modern web design. Landing pages, SaaS dashboards, and mobile onboarding screens all use them to break up flat layouts and create visual depth between sections. The shapes themselves are simple; a few noise-sampled paths connected with Bezier curves. But the tooling around them has historically been limited.
Most generators on the web offer a single wave layer, one export format, and minimal control over the output. If you need multi-layer depth, per-layer opacity, or a React component you can drop straight into your codebase, you end up either hand-coding SVG paths or wrestling with design tools that were not built for this workflow.
This article covers how SVG wave and blob generation works under the hood; the math behind simplex noise, the difference between wave paths and radial blob shapes, practical integration patterns for React and Tailwind projects, and a free browser-based generator that exports in six formats without touching a server.
What existing generators get wrong
Tools like SVG Wave, Get Waves, and Blobmaker each solve part of the problem. SVG Wave and Get Waves produce single-layer wave dividers. Blobmaker handles organic shapes but not waves. None of them let you stack multiple layers with independent opacity, export as a React component, or preview on both light and dark backgrounds.
The gap is in production workflows. A single-layer wave with a random shape is fine for a prototype. But when you need a three-layer section divider with specific brand colors, controlled amplitude per layer, and output that drops directly into a Next.js component; the single-layer generators fall short.
How the generator actually works
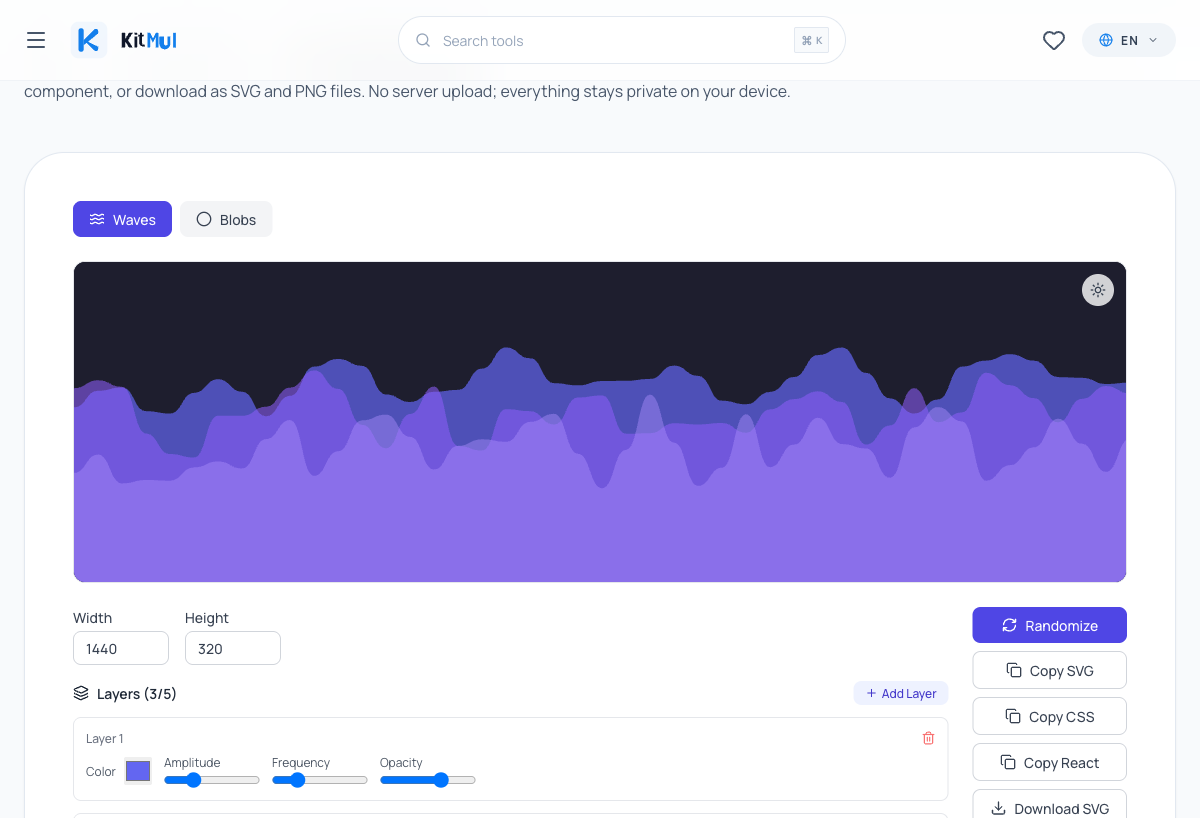
The tool has two modes: Waves and Blobs. Each uses a different algorithm, optimized for its shape type.
Waves: simplex noise on a horizontal axis
Wave shapes are generated using simplex noise, specifically the noise2D function. For each wave layer, the generator samples noise values along the horizontal axis to calculate Y offsets. These points are connected with cubic Bezier curves to produce smooth, organic-looking wave paths.
The key parameters per layer:
- Amplitude: controls how tall the waves are (the vertical displacement)
- Frequency: how many wave cycles appear across the width
- Opacity: transparency of each layer, which creates depth when stacking
- Color: independent hex color per layer
- Seed: a random value that gives each wave its unique shape
You can stack up to 5 layers. The visual trick that makes multi-layer waves look good is simple: put darker, more opaque layers in front and lighter, more transparent ones behind. This creates a parallax-like depth effect that a single flat wave cannot achieve.
Blobs: radial noise with Catmull-Rom splines
Blob shapes work differently. The generator distributes points evenly around a circle, then varies each point's radius using simplex noise. The resulting points are connected with Catmull-Rom-to-Bezier splines to produce a smooth, closed organic shape.
Parameters for blobs:
- Points: how many control points on the circle (more points = more complex edges)
- Complexity: how much the noise varies the radius (higher = more irregular)
- Size: the diameter of the base circle
- Color: fill color
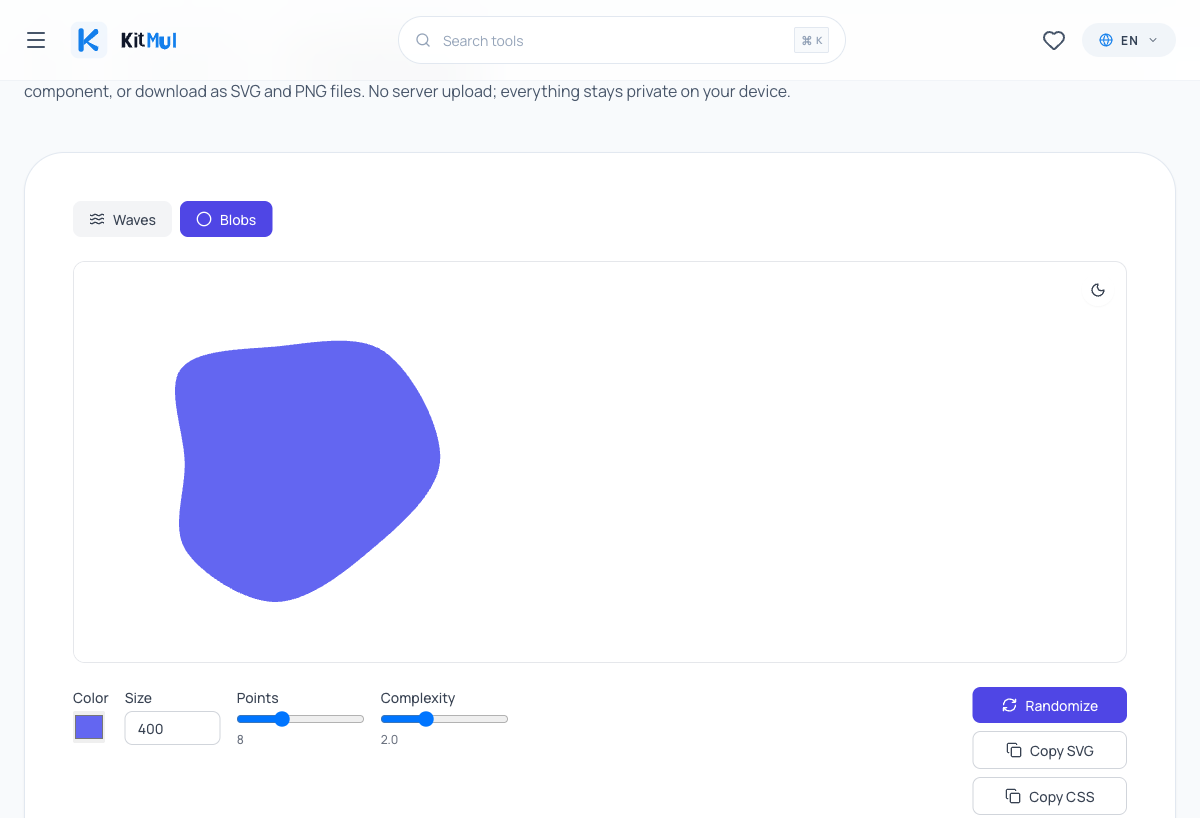
The math behind this is elegant. Ken Perlin's simplex noise is continuous; nearby input values produce nearby output values. This is what makes the shapes look natural instead of jagged. Math.random() would give you a spiky mess. Simplex noise gives you flowing curves.
Six export formats, and why that matters
The generator exports in six formats:
- Raw SVG code: paste directly into HTML
- CSS
background-image: a data URI you drop into abackground-imageproperty - React component: a ready-to-use JSX function with props
- SVG file download: standard
.svgfile - PNG file download: rasterized at 2x resolution for Retina displays
- Clipboard copy for all code formats
The React export is the one that saves the most time. Instead of manually converting SVG attributes from kebab-case to camelCase (stroke-width to strokeWidth, fill-opacity to fillOpacity), the tool handles the conversion automatically. If you are building with React or Next.js, this is a significant friction reducer.
The CSS export is useful for Tailwind projects. You can apply the wave as a background image using arbitrary values, keeping the decoration in CSS rather than in your component tree. If you are working with Tailwind CSS, this approach is cleaner than inline SVGs for decorative elements.
Practical patterns for web developers
Section dividers in landing pages
The most common use case. Drop a wave SVG between your hero section and your content area:
<section class="hero bg-indigo-900 text-white">
  <h1>Your Product</h1>
</section>

<!-- Wave divider generated by Kitmul -->
<svg viewBox="0 0 1440 320" xmlns="http://www.w3.org/2000/svg">
  <!-- paste your generated paths here -->
</svg>

<section class="content bg-white">
  <p>Your features section</p>
</section>
For this pattern, set the wave width to match your max layout width (1440px is a common choice) and the height between 200-400px depending on how dramatic you want the transition. Use 2-3 layers with colors that bridge your two section backgrounds.
If you need to match specific brand colors, the Color Palette Generator can help you find complementary shades for your wave layers. And if you want to add animation to the wave, the CSS Animation Generator produces keyframe animations you can apply directly to SVG elements.
Decorative blobs behind cards
SaaS landing pages love this pattern. A soft blob shape behind a feature card or pricing tier adds depth without visual clutter:
.card-container {
  position: relative;
}

.blob-decoration {
  position: absolute;
  top: -20%;
  left: -10%;
  z-index: 0;
  opacity: 0.3;
}

.card {
  position: relative;
  z-index: 1;
}
Generate a blob, copy the React component, and position it behind your card with absolute positioning. The key is keeping the blob opacity low (0.2-0.4) so it suggests depth without competing with your content.
Combining with other CSS effects
SVG waves pair well with other CSS properties. Add a box shadow to the section above the wave for extra depth. Use a glassmorphism effect on cards that sit on top of a wave background. Apply a CSS gradient to the section below the wave that matches your wave colors.
These combinations are where client-side tools win. When you can iterate on the wave, the shadow, and the gradient simultaneously in different browser tabs, the feedback loop is measured in seconds instead of round-trips to a design tool.
Why client-side generation matters
Every cloud-based design tool operates on the same model: upload your intent, wait for the server, download the result. For SVG generation, this is architecturally absurd. The computation required to generate a wave SVG is trivial; a few hundred noise samples and some path math. Your browser can do this in under 5 milliseconds. There is no reason for a server to be involved.
Beyond performance, there is the privacy angle. Client-side tools keep your data on your device. No telemetry on what colors you picked. No analytics on how many waves you generated. No account required. The tool runs JavaScript in your browser and produces SVG output. That is the entire data flow.
This is the same philosophy behind all of Kitmul's Design & CSS tools; from the CSS Grid Generator to the Clip-path Maker, everything processes locally.
SVG vs. raster images for web decorations
If you are still using PNG or JPEG section dividers, here is the comparison:
| Property | SVG | PNG/JPEG |
|---|---|---|
| File size (typical wave) | 1-3 KB | 30-200 KB |
| Scales to any screen | Yes | No (pixelates) |
| Editable with CSS | Yes | No |
| Animatable with JS | Yes | No |
| Adds HTTP requests | No (inline) | Yes |
| Retina-ready | Always | Only if @2x exported |
The W3C SVG specification has been stable since 2018. Browser support for inline SVG is universal. There is no technical reason to use raster images for section dividers in 2026.
If you need to convert between image formats for other assets, the Image Format Converter handles PNG, JPG, and WebP conversions locally. But for decorative shapes, SVG is the answer.
The math behind organic shapes
For those curious about the implementation details: the simplex noise algorithm was invented by Ken Perlin as an improvement over his original Perlin noise. The key insight is that simplex noise evaluates on a simpler grid (a simplex lattice) that requires fewer calculations per sample; O(n^2) instead of O(2^n) for classic Perlin noise in n dimensions.
In 2D (which is what the wave generator uses), simplex noise samples from an equilateral triangle grid rather than a square grid. This eliminates directional artifacts and produces more visually uniform randomness. The MDN documentation on SVG elements covers the rendering side; the noise function is what drives the creativity.
For waves, the generator calls noise2D(x * frequency, seed) for each sample point along the horizontal axis, multiplies by the amplitude, and offsets vertically. For blobs, it calls noise2D(cos(angle) * complexity, sin(angle) * complexity) for each point around the circle. Same function, different input mapping; same organic quality in both cases.
Try it
The SVG Wave & Blob Generator is free, runs in your browser, and requires nothing except a modern browser tab. Generate a wave, hit Randomize a few times until you find something that fits your layout, and copy the code.
If you are building a design system and need more CSS tools, the full Design & CSS Utilities collection includes 16 generators covering gradients, shadows, animations, border-radius, flexbox layouts, grid layouts, and more. All client-side, all free.
All processing runs locally in your browser. No data is sent to any server. The tool is free, open, and has no accounts or limits.